Tuesday, August 30, 2011

Snickerdoodle Muffins

We decided to go on a diet, well, not so much a diet, but a healthy food kick a few months back. We have been doing very well. On occasion, we may or may not have a bad day. On these "bad days," we may, or may not, bake a bunch of not healthy things. Haha. This weeks bad day item, was Snickerdoodle Muffins. Craig has been on a snickerdoodle kick these last two weeks! He already made two batches of Snickerdoodle cookies last week. So, it's official, we are bad dieters! It's also official that my hubby is addicted to StumbleUpon, and I could not be more proud! Here is the Muffin recipe that he found while stumbling late the other night.

Snickerdoodle Muffins

  • 2 cups flour

  • 1/2 tsp. salt

  • 2 tsp. cream of tartar

  • 1 tsp. baking soda

  • 1 stick butter, softened

  • 3/4 cup sugar

  • 2 eggs

  • 1 cup milk

  • 1 1/2 tsp. vanilla

  • 1 Tbs. sugar + 1 tsp. cinnamon for topping


  • We've never made muffins before, so we were surprised at how well these came out. They weren't very hard to make either.
    In a bowl, stir together the flour, salt, cream of tartar and baking soda.
     In a mixer bowl, cream the butter and sugar. Then, you can add the eggs.
      Add the milk and vanilla and mix until well combined.
     We were kind of unsure about this part, because our mixture looked like cottage cheese. It was chunky, and had a lot of liquid in it. Don't worry, it is okay.
    Stir the wet ingredients into the dry ingredients, just until moistened. The first batch we made was plain.  However, the second batch had Cinnamon and Sugar mixed in with the batter. It gave it a little more kick on the inside.
     Fill muffin cups 2/3 of the way full of batter.
      Sprinkle with cinnamon sugar.  We made it so the top was full.
    Almost done...
     These are the finished sprinkled muffins before going in the oven.
     Bake at 400 degrees for 15-20 minutes, or until a toothpick comes out clean.
     I ate these for breakfast every day for like a week.
     Did mention, I really..really.. like butter....
    Courtesy of Eat at Home

    Thursday, August 18, 2011

    Pulled Pork

    This has to be one of my favorite recipes that my hubby makes.  This may come as a shocker, but before I had met my hubby, I had never had pulled pork. I didn't eat a lot of anything before him. I was very plain Jane. Same old stuff all the time. Now I'll try a lot, not everything, but a lot.  I don't like to blog his recipes because I never really know how much of each ingrediant he uses, which frustrates me as a non cook. I like to know how much of everything that I need, and he can never tell me. He always just says use your judgement, which is slightly annoying. Be prepared, this recipe does take 6 hours to cook, so it's not a Rachel Ray 30 minutes or less. I apologize for that. I also would like to apologize for some of these shots. Did you ever have one of those days where you take a pic, look at it on camera, and then see it blown up and it is blurry. This was one of those days I guess.  Anyway, here goes.
    Dry Rub:
    3 Tbs Paprika
    3 Tbs Coarse Salt
    1 Tbs Brown Sugar
    1 Tbs Garlic Powder
    1 Tbs Dry Mustard
    Gloves- yes gloves, or something to cover your hands, they will turn red.

    Fresh Boneless Pork Butts (Pictured below)
    BBQ Sauce (whatever is your favorite) We use Sweet Baby Rays, 2 bottles.

    One large pan (or throw away pan) to cook Pork in.
    Foil

    This is really easy. Take all of your dry rub ingrediants and put them all in a small bowl.
     Unwrap pork, and place it in a big bowl. This is where you will pour all of your dry rub.
     Mix all of the rub together well.
     Pour some of the rub on the Pork.  Try to spread it on all over the top.
     This is where the gloves come in to play. 

     If you aren't planning on cooking it that day, you can put it in a bag and keep it in the fridge. If you are cooking it that night,  go ahead and put it in the pan.
     We use one of these throw away pans with the lids, that way it's easy to store. Use a different one to store it, not the one you cook it in.
     Here is the Pork after it has been rubbed.
     Cover it with foil, tightly, so that the steam doesn't escape. Cook at 300 degrees, for 6 hours.
    This is what it should look like when it comes out. It smells so good!
     Next, take the pork out of the pan, and place it on a cutting board. Get rid of the pan with all the juice in it.  You are going to take two forks, and literally fork it. Hahaha. Sorry. You might have to scrap off the top layer, beause sometimes it can be fatty. Get rid of all the icky stuff, then pull apart the good stuff. Put all the good stuff and put it into the other conatiner that I mentioned earlier.
     We put both bottles of the BBQ sauce in ours. Mix it in small amounts, til it is all covered well.
     This is what it should look like when it is done. You can eat it by itself, or in sandwich form, which is what we do.
     Tadaaa! All done.  I can eat this for days!
    Enjoy!
    Courtesy of Tyler Florence
    Thursday, August 11, 2011

    Fresh Salsa with a bit of a kick!

    My hubby has been making this salsa for awhile now. I'm not a fan of anything spicy, or with a "little kick" to it, but lately I have been trying to broaden my food horizon.  I am trying to be a big girl these days, and not a plain Jane food eater. I decided to give it a try. The verdict is, I love it! Why was I not eating this before?! I don't know, but I am now. It's really easy to make it, and you can tweak the ingredients if you want. Here are the main ones that you will need.
    Tomatoes x 5
    Red Onion x 1
    Red, Green, and Yellow Pepper x 1 each
    Jalapeno x 2
    Cilantro
    Lemon x1
    Lime x1
    Garlic (chopped)
    Orange juice (very small bottle, you only need a splash)
    Franks Red Hot sauce (splash)
    Distilled Vinegar (Splash)
    Oil and Vinegar (splash)
    Salt (Sprinkled)
    Chips ( whatever brand is your fave!)

    Start by washing all of your tomatoes and peppers. I use the Vidalia Chop Wizard, it makes the salsa into those fab little squares.
     Cut the top and bottom of the peppers off,  and then cut out the insides. This is what they should look like when cleaned out.
     Place them in your wizard like so, or chop them in a grinder.
     Take your Jalapeno peppers, and clean half of them out. You want a little kick, but not that much.
     After you mix all that together, your salsa should look like this.
    Next, chop up the onion.
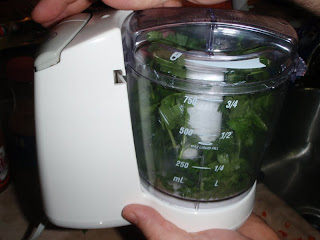
     We put the Cilantro in our little processor. That way it was tiny enough to mix in well.
     It came out to be this size.
     Add your salt next. We just kind of shook it back and forth over the bowl, there wasn't really a measured amount, just use your judgement.
     The same goes for the hot sauce.  If you like it hot, splash away my friends! Add a scoop full of Garlic to the mix, and squeeze the Lemon and Lime until all the juice is out. Try not to get any of the pulp in it.
    All done! We like it with the multi grain Tostitos Scoops. They have a little flavor to them that adds a little more to it. Pictured here is a Tostitos Artisan chips in Fire Roasted Chipotle.
    These are for me....

    Enjoy!


    Related Posts Plugin for WordPress, Blogger...