Wednesday, November 24, 2010

Streusel-Topped Pumpkin Pie

Happy Thanksgiving everyone!! I hope everyone is having a great day with family and friends. I spent the day before cooking my heart out. We made cakes, pies, and pumpkin doggie treats for Steiner.  One of the pies I made was a Streusal topped Pumpkin pie. Believe it or not, this is the first time I've made a Pumpkin pie. I usually don't have any luck with pie crusts so I stay far away from them, but this time was different. I was determined to master this one!
Ingredients
1 box of Pillsbury refrigerated pie crusts, softened as directed.
 Filling-
2 eggs, beaten
1/2 cup Sugar
1 can (16 oz) Pumpkin (not Pumpkin Pie Mix)
1 can ( 12 oz) Evaporated Milk
1 tsp Ground Cinnamon
1/2 tsp Salt
1/2 tsp Ground Ginger
1/8 tsp Ground Cloves
Topping-
1/2 cup Quick Cooking Oats
1/2 cup Packed Brown Sugar
1/4 cup Butter or Margarine, softened.

Heat Oven to 425. Place pie crust in a 9-inch glass pie plate as directed on box. Make sure you "fork" holes in the sides and bottom.
In a large bowl, beat all filling ingredients with hand beater or wire whisk until blended. Pour filling into the the pie crust.
Bake pie for 15 minutes.
Remove from oven; reduce oven temp to 350. Cover crust edge with 2-3 inch wide strips of foil to prevent excessive browning. Bake for 35 minutes.
Meanwhile in a small bowl, mix topping ingredients together, until crumbly with a fork.
After 35 minutes, remove pie, and sprinkle toppings over the top.
Bake about 10 minutes longer, or until a knife comes out clean. Cool on a cooling rack for 30 minutes. Refrigerate about 4 hours, or until chilled before serving. Keep in fridge til ready to serve.

Courtesy of Pillsbury
Enjoy!

Tuesday, November 23, 2010

Jaxson's Ice Cream Parlor

This afternoon we went to one of my favorite places in South Florida, Jaxson's Ice Cream Parlor in Dania Beach. If you've eaten there before, you know why it's a favorite. If you haven't, you need to go next time you're in the area. I promise you, you will not be disappointed.  Let me start by saying, the food is amazing. Not only is it big in size, but it's big on taste also. We mainly go there for the ice cream, but if you're hungry, grab a bite to eat there for sure.  This place has been featured on the Food Network a bunch of times, so you know it is legit!
So here was my drink today, it was pretty much an pitcher.
I shared the hot dog with my hubby, because I never even come close to finishing it.
Without a doubt, some of the best cheese fries on the planet.
The rest of the crew had Pastrami sandwiches. You can't even fit it in your mouth.
We took a short break to take some pics of their candy section. Jaxson's has all of the old time candy from when I was little. They have Big League Chew, old candy cigarettes, and little milk carton bubble gum, and more!
Here is an old time Penny Machine.
Some of the fun decor they have.
They have an popcorn maker and they make the popcorn there before bringing a bucket to your table.

Okay, so on to the ice cream. This time I had a Strawberry Banana Split with Cookie Dough, Oreo, and Mint Chocolate Chip ice cream.
 This was Craig's mom sundae.
 Craig had the Soup Bowl. It had Chocolate and Vanilla ice cream.
He covered it in Caramel...
So this is a picture of a man holding a kitchen sink. Weird right? The thing is, is that they serve a dessert item called "The Kitchen Sink." They actually take a kitchen sink and put 4 giant scoops of ice cream in it, and the spoons you use are actually soup ladles. I know all of this because years ago, I ordered this item. My friends and I actually had to stand up to eat it. An air horn went off, and the next thing I saw was a sink with 4th of July sparklers in it! It was intense. People were taking pictures of us the entire time, it was quite awkward, but worth it my friend.
Me, Rose, and our waitress. She has been our server the last few times we went.
Monroe Udell is the owner of Jaxsons, and actually had a street named after him.
Craig inside "The Sink"
The guys inside an split!
Have a great time!!

Wednesday, November 10, 2010

Homemade Hand Scrub

For those of you who don't know, I work at an animal hospital. I wash my hands like 40 times a day. By the end of my work week, my hands are like sandpaper. I really like all the hand scrubs that are out on the market, but hate spending $30-$40 dollars. So I went on a search for household products that would do the trick, and were inexpensive. There are a lot of scrubs out there. I have seen Sugar, Brown sugar, salt, or sea salt. They all contain different smells and flavors. Here is my at home version which was very easy to make.
-Sugar   1/2 cup
-Brown Sugar  1/2 cup
-Honey  1 Tablespoon (room temp)
-Lemon Juice  5-7 drops
-Aloe plant (I had it on hand, not needed if you don't have it)
I used Orange extract for smell, but you can use almond, cinnamon, or peppermint too!) I used about 1 teaspoon.
Vitamin E oil (if you plan on storing it.)
So, first I added my 2 sugars and "forked" them until the brown sugar was completely mixed.
Next I added my honey. You can warm the honey for about 10 seconds in the microwave if you would like your hand scrub to be warm when used. Not more than 10 seconds though, as it can become very hot!
Next, if you have aloe, go ahead and cut a piece off, and squeeze a bit of the cream into bowl. If you have a hard time, you can cut it down the middle and open the plant itself.
Next, add your scent of choice. I added the orange this time.
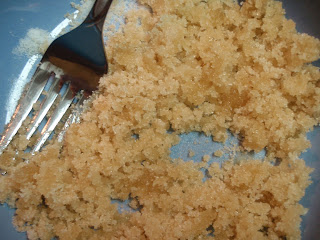
This is the final product.
I placed some in a little tin for storage.
You can hand these out to friends or for the holidays. I am going to hand mine out in little holiday tins. There are things that you can add to your scrub to make it last longer, since some of the ingredients need to be refrigerated. If you are not planning on using it right away, you can add some Vitamin E oil to your small batch. This will keep bacteria out. Make sure you store your scrub in an airtight plastic container, in the fridge. If you are planning on using it in the shower, keep it in a place where water will not fall ito it (high shelf, or only bring the amount you will need) since water can promote bacteria growth. Have fun making your own little concoctions!!
Enjoy!

Wednesday, November 3, 2010

Halloween Vanilla Creepy Cupcakes

Hi my friends! Hope everyone out there had a safe and Happy Halloween! I was hoping to have a couple of Halloween recipes on here, but I didn't have as much time as I thought I would to prepare them. I did manage to get in some cupcake time for a party that I was attending. They were a little harder than I thought they would be. The recipe was quite easy, but making sure the frosting wasn't to hot or to cold was a little trickier than planned.

Vanilla Creepy Cupcakes
Okay, so because I was on a time crunch, and was baking a lot of things that day, I decided to use Pillsbury Funfetti for the cupcakes. It was quick and easy, and delish like always. It was a big time saver!

Mix up all the ingredients as directed on box.
 Pour your batter into your holders.I found these super cute bat cups at Joann Fabrics, but you can buy them anywhere.
Let your cupcakes cool completely before frosting them. While they are cooling you can begin to make your frosting. I made Fluffy Vanilla Buttercream for the cupcakes. The recipe below makes a large amount of buttercream, it can be halved.

6 sticks Unsalted Butter
9 cups sifted Confectioners Sugar
1 teaspoon Pure Vanilla Extract
Twizzlers and Jelly Beans
Melted chocolate (for dabbing eyes on jelly beans, a small amount of a Hershey bar, or morsels will do.)

Start by beating the butter in an electric mixer on medium high speed until pale and creamy, about 2 minutes.
Side Note: My beater was turned on at the lowest setting, and I still managed to fling butter all over me and the kitchen. So I would suggest throwing a towel over your blender. make sure it is not anywhere near any pieces that spin, so that it doesn't tangle and cause a problem.
Reduce speed to medium. Add Confectioners Sugar, 1/2 cup at a time, beating well after each addition and scraping down the sides of the bowls with a spatula as needed, (about 5 minutes total.) After every 2 additions, raise speed to high, and beat 10 seconds to aerate the frosting.Add vanilla, and beat until smooth.
Side Note: I learned that Confectioners Sugar can fly as far as butter, use caution...
So after I tasted the cream, I realized it was missing something. It had the buttercream taste, but seemed a little bland. It also seemed a little gritty. Upon suggestion, I set aside about 2 cups of frosting, and added a little bit of milk to it. To fix the flavor, I also added a bit of Amaretto.
Side Note: The buttercream can be kept in the fridge for two days in an airtight container. When you are ready to use it, bring to room temp, then beat for 10 minutes on low speed.

Lets get frosting! To frost your mummys you are going to need a small flat tip. (Ribbon tip)  We will be making lines like mummy wrap. 
Begin frosting by covering the top of your cupcake like you normally would. That was if you miss any spots with the "wrap"  they won't be noticed.


Now you can grab your candy. Like I said, I used Twizzlers and Jelly beans for the eyes and mouth. You can use red gummy candy for the mouth, but I couldn't find a package with all red gummies.
Cut the Twizzlers into small pieces for the mouth, and pick out two matching eyes. Place on frosted cupcake.

Now, I wish that I could tell you there is some kind of trick to this next part, but there isn't. Not one of the mummys I made matched in any way. Basically you are just wrapping until you feel that it looks right. If you feel that your lines are starting to run together, you can put in the fridge for a little bit, then start again.
For the last part, I took a bit of chocolate and melted it. Then I put just a dab on the jelly beans so that it looked like eyes. Here is your finished product!
Coutesy of Martha Stewart
Enjoy!
Related Posts Plugin for WordPress, Blogger...